Avatar Authoring - Hand Tracking
How to set up hand and finger motion for your avatar, which can be driven by Leap Motion Hand Tracking.
Model Requirements
Hand Tracking using Inverse Kinematics (IK) to move a character’s arms with their hands. Your character’s model should be built with IK in-mind.
kemorig tries to accomodate any skeleton, but you probably want your model to fall into one of the following styles:
Simple (No Twist Bones)
![]()
This is the simplest setup for an arm skeleton.
This style of arm will have difficulty deforming well when twisting wrists or raising the upper arm into extreme positions. But you can still tweak settings to get decent results in kemorig.
1 Upperarm Bone, 1 Forearm Bone, with Twist Bones
![]()
This is the ideal skeleton for kemorig.
This skeleton is the same as the simplest one, but has twist bones inserted into the heirarchy. The heirarchy down the arm is still shoulder > upperarm > forearm > wrist.
2 Upperarm Bones, 2 Forearm Bones
![]()
This skeleton works the same as the last one, but the heirarchy is different. The heirarchy down the arm is shoulder > upperarm01 > upperarm02 (twist) > forearm01 > forearm02 (twist) > wrist.
A skeleton like this will need to manually specify its arm bones when setting up Hand Tracking.
Other
If your character’s skeleton does not match one of the examples above, you can probably still get it to work with kemorig’s hand tracking! But, kemorig’s Hand Tracking will only support 1 twist bone each for the upperarm and forearm out of the box.
Add the Kemorig Tracking Node to your Anim Blueprint
If you already have a Kemorig Tracking node in your Blueprint, continue to the next step.
Open your character’s animation blueprint, and navigate to the AnimGraph.
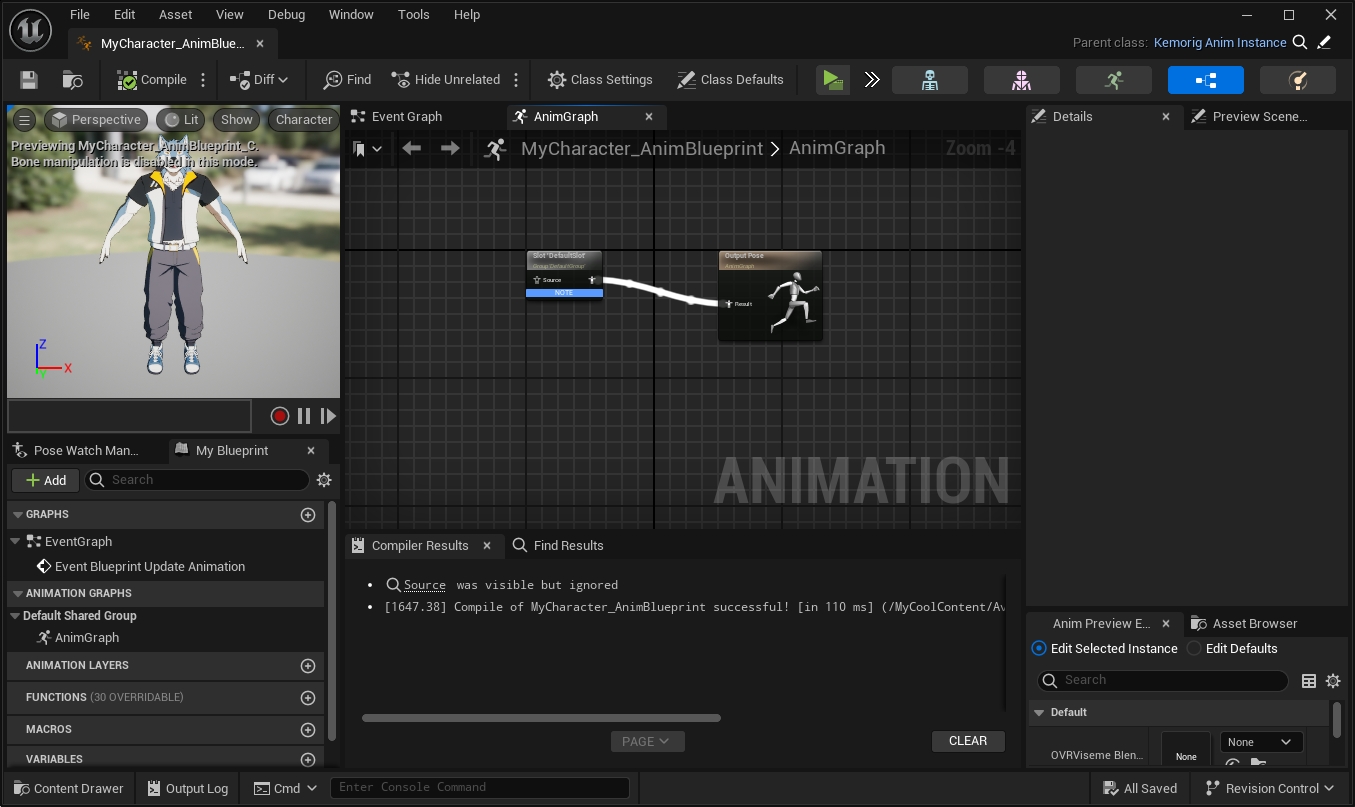
Right-click the graph and add these nodes:
- Kemorig Tracking - kemorig helper node for applying tracked motion to your skeleton.
- Get Final Pose Info - kemorig function for getting pose info for the current frame.
Connect the Kemorig Tracking node in your graph, and pass the output of Get Final Pose Info into it.
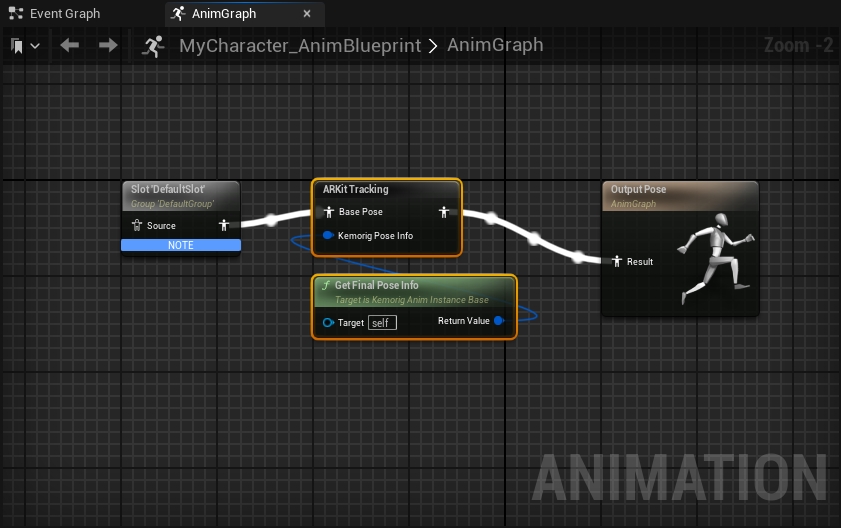
Where you place this node in your graph matters! The flow from left to right shows how the pose is built step-by-step. The ARKit Tracking node is additive, meaning whatever pose goes into it will have the ARKit motion added on top of it.
Hand Tracking Settings
Now, select the Kemorig Tracking node, and enter settings in the Details Panel.
![]()
Reference Pose Style
Near the top of the node’s settings is “Reference Pose Style”.
![]()
This setting helps kemorig automatically detect bone orientations in the arms. You can leave it at auto, but if you run into bad results, setting this to match your model can help.
Chest (Position Ref)
In the node’s details, navigate to the Hand Position Tracking category. The first setting you will see is Chest (Position Ref)
![]()
The bone you specify here is what Hand Tracking will position itself relative-to. It expects the bone for your character’s Upper Chest.
You can also use the Position Ref Offset parameter to further offset Hand Tracking from this bone.
Enable Hand Motion Support, Enter Wrist Bones
Next, enable Left/Right Hand Motion Support, and then enter your character’s wrist (i.e. hand) bones.
![]()
If your character's arm skeleton follows the heirarchy:
shoulder > upperarm > forearm > wrist
kemorig will automatically detect the other arm bones after specifying the wrist
(optional) Manually specify arm bones
If your character’s arm skeleton does not follow the heirarchy:
shoulder > upperarm > forearm > wrist
You need to manually enter your arm bones as well.
![]()
Adjust Twist, Enter Twist Bones
Next, consider arm twisting. When your character’s arms are positioned with IK:
- Twisting your wrists causes your forearm to twist.
- Rotating your elbow causes your upper arm to twist between your shoulder and elbow.
To tackle this problem in kemorig, you have two options:
No Twist Bones
![]()
If your skeleton has no twist bones, you can adjust what percentage to twist the upperarm and forearm.
Twist Bones
![]()
If your skeleton does have twist bones, enable Use Twist Bones, and enter them in the fields that appear.
You can then adjust what percentage the arm and twist bones will rotate.
If your model only has some twist bones (e.g. only wrist twists), you can leave some twist bone fields blank.
(optional) Specify IK Pole Target Bones
When your character’s arms are positioned with IK, kemorig has to know where to position the elbows. It will automatically position elbows by default, but sometimes you may want to use bones to guide them. These bones are known as “IK Pole Targets”.
![]()
These bones will not be used automatically! They will only be used if your avatar’s Tracking Settings blend in their use.
For example, you may have a Stance with a complex pose where precise elbow placement is important. This Stance can override Tracking Settings to use your avatar’s IK Pole Target bones.
Tip: even if your skeleton does not have dedicated IK pole bones, it often looks good to specify the forearm bone as a target. This will cause Hand Tracking to use the pre-hand-tracking forearm position as an elbow target.
Finger Tracking settings
Settings for Finger Tracking are also in the Kemorig Tracking node.
Enable Left/Right Finger Motion Support to enter settings.
![]()
Enter Thumb / Finger Tip Bones
By default, kemorig has you enter the tip bones for each digit, and automatically detects the rest of the bones in each digit.
More options appear once you enable Finger Motion Support. Enter the bones corresponding to each thumb/finger tip.
![]()
Number of Bones per Thumb / Finger
kemorig can track 3 bones per thumb or finger. Based on your character’s skeleton, you can tweak how many bones it expects based on the specified tip bones.
![]()
If you like, you can also enable Manual Thumb / Finger Bone Definitions and enter each bone of each digit manually.
Manually entering digit bone definitions is not recommended, and should only be necessary for very unusual characters.
Manual Bone Orientations (Optional)
This section is for rare cases and can be skipped for most avatars.
Kemorig performs some automatic calculations to determine the orientation of your avatar’s bones.
In rare circumstances you may run into issues with how tracking yaw/pitch/roll are applied to bones. In this case, you can manually input the orientations of each bone.
The Hand Position Tracking and Finger Tracking categories have Advanced settings that allow you to manually enter orientations if you need to.
Reminder: Reference Pose Style
Remember “Reference Pose Style” near the top of the Kemorig Tracking node settings.
If you experience bad automatic bone orientations (especially for fingers or thumbs), try setting this to match your model’s ref pose.
Thumb Bone Orientations
Thumb orientations are especially tricky, because different character models can pose their thumbs very differently in their ref poses.
Because of this, you may need to manually enter orientations for thumb bones only.